EN
EN FR
FR PT
PT AR
AR
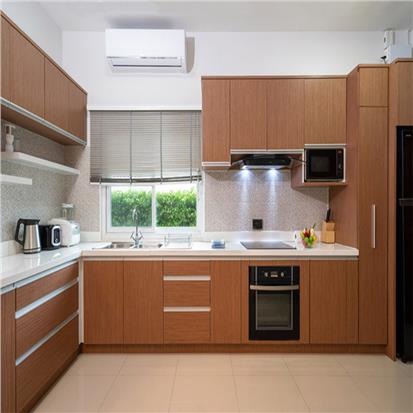
Tiling a kitchen wall is a great way to add an elegant touch to your kitchen. It can transform the look of your kitchen, making it feel more modern, brighter, and more inviting. Before you begin the tiling process, it's essential to know the materials you need, the precautions you should take, and the steps to follow to ensure a successful project.

Why Tile a Kitchen Wall?
Kitchen walls are usually subjected to stains, grease, and water spills. Tiles, especially those made of porcelain, ceramic, or stone, are resistant to moisture and easy to clean. Tiling your kitchen wall, therefore, provides a durable and hygienic surface that is not only beautiful but also functional.
Materials Needed for Tiling a Kitchen Wall
Before starting the tiling process, you'll need the following tools and materials:
Tiles
Tile adhesive
Grout
Tile spacers
Measuring tape
Spirit level
Tile cutter or tile saw
Grout spreader
Grout sponge
Safety goggles
Dust mask
Gloves
Safety Precautions Before Tiling a Kitchen Wall
Tiling can be hazardous, and it's essential to take precautions to protect yourself. Wear safety goggles to protect your eyes from flying debris when cutting tiles. A dust mask and gloves will protect you from inhaling tile dust and coming into contact with tile adhesive or grout.
Preparing to Tile
Measuring the Kitchen Wall
Before purchasing tiles, measure the kitchen wall to determine the amount of tile you need. Measure the length and height of the wall and multiply the two measurements to get the total square footage. Add 10% more tile to account for wastage, cuts, and breakages.
Choosing the Right Tiles for the Kitchen Wall
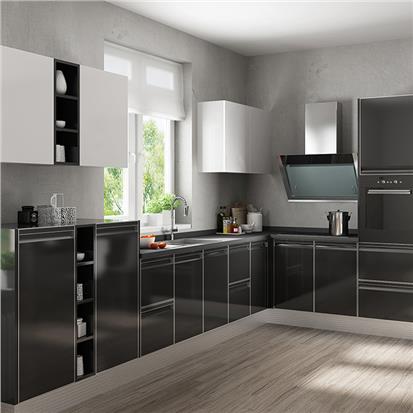
When choosing tiles for your kitchen wall, consider factors such as color, texture, and durability. Porcelain and ceramic tiles are popular choices for kitchen walls due to their durability and ease of maintenance. Glass tiles are an excellent choice for creating a glossy, modern finish, while natural stone tiles add a rustic, natural look.
Preparing the Wall Surface for Tiling
Prepare the wall surface by cleaning it thoroughly, and removing any dirt, grease, or stains. Fill any cracks or holes with filler and allow it to dry. Sand the wall surface lightly to create a rough texture that helps the adhesive stick better.
Marking the Tile Layout on the Kitchen Wall
Use a spirit level and a pencil to mark a horizontal line along the bottom of the wall where you'll begin tiling. Use tile spacers to create a uniform gap between the tiles and mark the layout on the wall to ensure that the tiles are level and evenly spaced.

Cutting Tiles
Cutting tiles is an important step in tiling a kitchen wall, and it requires precision and attention to detail. Here are some things you need to know about cutting tiles for your kitchen wall:
Different types of tiles to choose from
Before you start cutting tiles, it's important to consider the type of tile you're working with. Some tiles are easier to cut than others, while some require specialized tools and equipment. Here are some common types of tiles and their cutting characteristics:
Ceramic tiles: These are the most commonly used tiles in kitchens, and they're relatively easy to cut with a tile cutter or a wet saw.
Porcelain tiles: These tiles are denser and harder than ceramic tiles, which means they require a diamond blade wet saw to cut them.
Glass tiles: These tiles are more fragile and require special attention when cutting. A diamond blade wet saw is recommended for cutting glass tiles.
Natural stone tiles: These tiles are the hardest to cut and require specialized equipment such as a wet saw with a diamond blade.
Tools needed to cut tiles
To cut tiles for your kitchen wall, you'll need the following tools:
Tile cutter: This tool is used for cutting straight lines in ceramic tiles.
Wet saw: This is a specialized tool that uses a diamond blade to cut through hard materials like porcelain and natural stone.
Tile nippers: These are used for cutting irregular shapes and trimming small pieces of tile.
Measuring and cutting tiles
When measuring tiles for cutting, it's important to make accurate measurements and mark them on the tile using a pencil or a marker. Always double-check your measurements before cutting the tile.
To cut straight lines in ceramic tiles, use a tile cutter to score the tile along the marked line. Apply pressure on the tile cutter handle to snap the tile along the scored line.
For irregular shapes or curves, use tile nippers to carefully trim the tile. Hold the tile nippers at a 45-degree angle to the tile and slowly apply pressure until the desired shape is achieved.
Safety precautions while cutting tiles
Cutting tiles can be dangerous if proper safety precautions are not taken. Here are some safety tips to keep in mind:
Wear safety goggles to protect your eyes from flying debris.
Use gloves to protect your hands from sharp edges.
Keep your fingers away from the blade of the tile cutter or wet saw.
Always unplug the wet saw before changing the blade or making any adjustments.
Installing Tiles
Now that you have prepared the wall and cut the tiles, it's time to start installing them on your kitchen wall. Here's what you need to know about installing tiles:
Preparing the adhesive for the kitchen wall
Tile adhesive is used to attach the tiles to the kitchen wall. It's important to choose the right adhesive for your tiles and the wall surface. Follow the manufacturer's instructions for mixing the adhesive.
Applying adhesive on the kitchen wall
Use a notched trowel to apply the adhesive evenly on the wall surface. Spread the adhesive in small sections to prevent it from drying out too quickly. Use a combing motion to create grooves in the adhesive that will help the tiles adhere better.
Installing the tiles on the kitchen wall
Starting at the bottom of the wall, press the first tile firmly into the adhesive. Use tile spacers to ensure that the tiles are evenly spaced. Continue installing the tiles, working your way up the wall in rows.
Creating a tile pattern on the kitchen wall
Depending on the type of tile and the design you want to achieve, you may need to create a pattern with the tiles. Lay the tiles out on a flat surface to experiment with different patterns before installing them on the wall. You can use a chalk line to create a straight line to follow when installing the tiles.

Grouting and Finishing
Grouting is the process of filling the gaps between the tiles with a special mixture called grout. This not only makes the tiles look better but also helps to protect them from water damage. Here's what you need to know about grouting and finishing your kitchen wall:
Preparing the grout for the kitchen wall
Grout comes in many colors, so choose the color that best matches your tiles. Mix the grout according to the manufacturer's instructions, and use a rubber float to apply it to the gaps between the tiles.
Applying grout on the kitchen wall
Hold the rubber float at a 45-degree angle and push the grout into the gaps between the tiles. Work in small sections, and use a damp sponge to wipe away any excess grout before it dries. Allow the grout to dry for at least 24 hours before cleaning the tiles.
Cleaning and finishing the kitchen wall
Use a damp sponge to clean the tiles and remove any remaining grout residue. Once the tiles are clean and dry, you can apply a sealant to protect the grout from moisture and staining.
Sealing the tile grout for longevity
Sealing the grout will help to protect it from moisture and stains. Follow the manufacturer's instructions for applying the sealer, and be sure to apply it to the grout lines only. Allow the sealer to dry completely before using the kitchen.
Tiling a kitchen wall can be a challenging project, but with the right tools and techniques, it's a job that can be tackled by DIY enthusiasts. By following the steps outlined in this article, you'll be able to create a beautiful and functional kitchen wall that will stand the test of time.
Remember to take your time and pay attention to the details, and don't be afraid to seek professional help if you're unsure about any aspect of the project. With a little patience and perseverance, you'll be able to enjoy the fruits of your labor for many years to come.


 16
16