EN
EN FR
FR PT
PT AR
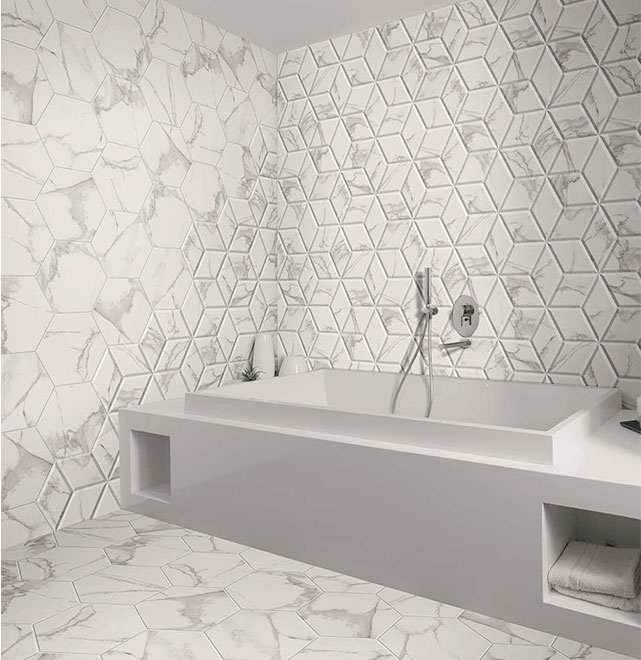
ARHow to Install Hexagon Tile on Wall?
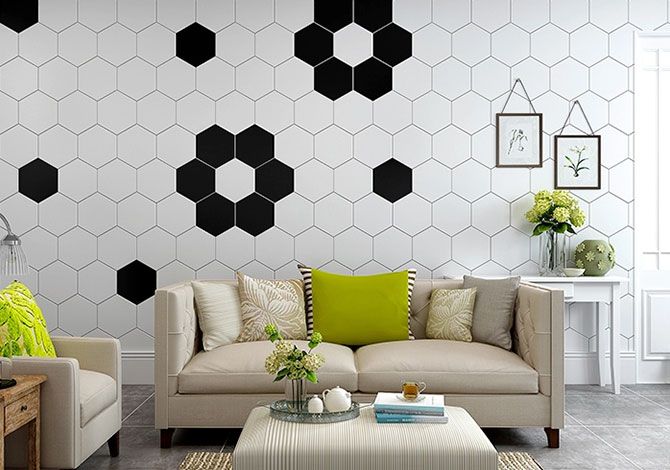
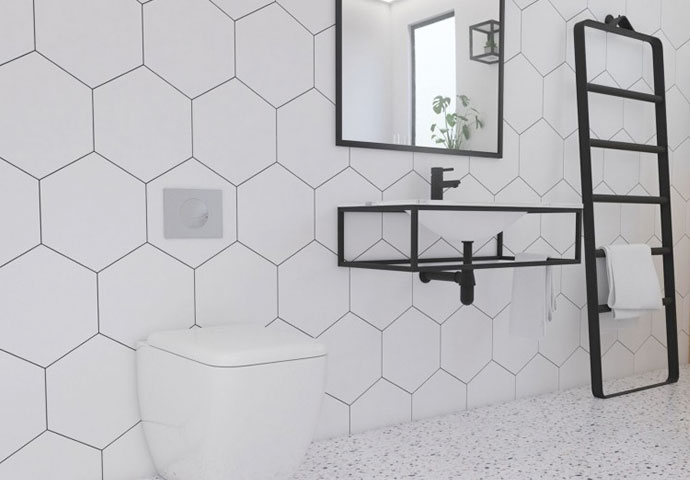
Hexagon tiles are a unique and popular choice for home decor, adding a stylish touch to any room. With their geometric shape and modern appeal, hexagon tiles are a great choice for wall installations. Installing hexagon tiles on a wall is not as complicated as it may seem, and with the right tools and preparation, you can complete the job with ease. In this article, we will guide you through the steps of installing hexagon tiles on a wall.
Explanation of Hexagon Tiles and Their Popularity
Hexagon tiles are six-sided tiles that create a hexagonal shape when installed. These tiles come in a variety of sizes, colors, and materials, including porcelain, ceramic, and natural stone. They have become increasingly popular in recent years due to their unique and eye-catching design, which adds depth and texture to any space. Hexagon tiles are often used for accent walls, backsplashes, and even entire bathroom or kitchen walls.
Benefits of Using Hexagon Tiles on Walls
Hexagon tiles offer several benefits when used on walls. Their geometric shape creates an interesting pattern that draws the eye, making them a great choice for feature walls. They also come in a variety of sizes, colors, and materials, making it easy to find the perfect tile for your project. Additionally, hexagon tiles are durable, easy to clean, and resistant to moisture, making them an ideal choice for wet areas such as bathrooms and kitchens.
Pre-Installation Considerations and Planning
Before you begin installing hexagon tiles on a wall, there are a few considerations to keep in mind. First, consider the size of the tiles you want to use and the pattern you want to create. This will help you determine the number of tiles you will need and how to cut them. Additionally, make sure the wall surface is clean, flat, and dry before installation. You should also ensure that you have all the necessary tools and materials for the job.
Tools and Materials
To install hexagon tiles on a wall, you will need the following tools:
Notched trowel
Tile spacers
Tile cutter or wet saw
Level
Rubber mallet
Grout float
Sponge
Bucket
You will also need the following materials:
Hexagon tiles
Tile adhesive
Grout
Caulk
Sealer (optional)
Preparation
Once you have gathered all the necessary tools and materials, it's time to prepare the wall surface. Start by measuring the wall to determine how many tiles you will need. Next, determine the tile placement and pattern you want to create. This will help you determine where to start and how to cut the tiles to fit around obstacles.
Before applying adhesive to the wall, make sure it is clean and dry. Remove any dirt, debris, or loose paint from the surface. You can use a scraper or sandpaper to smooth out any rough spots or bumps. If the wall surface is uneven, you may need to use a leveling compound to create a smooth surface.
Cutting Tiles to Size
To cut the tiles to size, use a tile cutter or wet saw. Measure the space where the tile will be installed and mark the tile with a pencil or marker. Use the tile cutter or wet saw to cut the tile to size. Be sure to wear safety goggles and gloves when cutting tiles.
Installation
Now it's time to begin the actual installation process. This is where all the pre-planning and preparation come together.
Mixing the adhesive
Before applying the adhesive, it's important to mix it according to the manufacturer's instructions. Use a mixing paddle attached to a power drill for best results. Make sure the adhesive is evenly mixed and has a smooth consistency.
Applying adhesive to the wall
Starting at the bottom of the wall, apply the adhesive to a small area using a notched trowel. Spread the adhesive evenly, making sure to keep the grooves of the trowel in the same direction. Don't apply too much adhesive at once as it may dry out before you have a chance to install the tiles.
Placing the first tile:
Place the first tile at the bottom of the wall, using the reference lines you marked earlier as a guide. Press the tile firmly into the adhesive, using a slight twisting motion to ensure good contact. Check the level of the tile with a spirit level and adjust if necessary.
Ensuring proper spacing and alignment:
Use plastic spacers to maintain consistent spacing between tiles. Make sure the tiles are aligned properly by checking regularly with a spirit level.
Continuing the installation
Continue installing tiles in rows, working from the bottom up. Apply adhesive to a small area at a time and avoid covering too much area at once. Use tile spacers to maintain consistent spacing and check regularly for level and alignment.
Cutting tiles to fit around obstacles
When you encounter obstacles such as outlets or switches, measure and mark the tiles to fit around them. Use a tile cutter or tile saw to make the necessary cuts. Use caution when cutting tiles and wear eye protection.
Installing edge tiles
When you reach the top of the wall or a corner, you may need to cut tiles to fit. Measure and mark the tiles and use a tile cutter or tile saw to make the necessary cuts. Place the tiles in position and check for level and alignment.

Grouting
Once the tiles are in place, it's time to fill the gaps between them with grout. This not only improves the appearance of the installation but also helps to seal the tiles and prevent moisture from penetrating the wall.
Mixing the grout
Mix the grout according to the manufacturer's instructions. It's important to mix only as much grout as you can use in 20-30 minutes to avoid it drying out before it can be applied.
Applying the grout to the tiles
Using a rubber float, apply the grout diagonally across the tiles, making sure to fill all the gaps. Work in small sections to prevent the grout from drying out. Use a damp sponge to wipe away any excess grout from the tiles.
Removing excess grout
After the grout has been applied and allowed to be set for a few minutes, use a damp sponge to clean the tiles again and remove any remaining grout haze. Let the grout dry for 24 hours.
Cleaning the tiles
After the grout has dried, clean the tiles again to remove any remaining residue or haze. Use a grout sealer to protect the grout from moisture and staining.
Finishing Touches
The installation process is almost complete. These final touches will give your hexagon tile wall a professional, polished look.
Sealing the tiles
Sealing the tiles is an important step in ensuring their longevity and durability. Use a tile sealer to protect the tiles from moisture and staining.
Inspecting the installation for any issues
After the installation is complete, inspect the tiles for any cracks, chips, or other issues. Make any necessary repairs before proceeding.
Applying caulk to corners and edges
Use caulk to fill any gaps between the tiles and adjacent fixtures or surfaces. This will help prevent moisture from seeping in and causing damage.
Reinstalling fixtures and accessories
After the caulk has dried, reinstall any fixtures or accessories that were removed during the installation process.

Maintenance
Regular cleaning and upkeep
To keep the hexagon tile wall looking its best, regular cleaning and upkeep are essential. Use a non-abrasive cleaner and a soft sponge or cloth to wipe down the tiles.
Repairing any damaged tiles
If any tiles become damaged, they should be repaired or replaced as soon as possible to prevent further damage to the wall.
Re-grouting as needed
Over time, the grout may become cracked or discolored. In this case, it may need to be removed and replaced with fresh grout.
Installing hexagon tiles on a wall can seem daunting, but with the right tools, materials, and techniques, it can be a straightforward and rewarding DIY project. By following the steps outlined above, you can achieve a professional-looking hexagon tile installation on your own.
Remember to take your time and measure twice before cutting. Proper preparation, including measuring the wall, determining tile placement and pattern, and preparing the wall surface, is key to a successful installation. Finally, don't forget to apply a sealer to the tiles and grout to protect them from moisture and staining. With a little patience and attention to detail


 16
16