EN
EN FR
FR PT
PT AR
ARInstalling drywall (also known as sheetrock or wallboard) is an important part of building a house. It takes a lot of time to build the basic room before installing the drywall, so that it can be painted or wallpapered later. If you are working on a drywall installation project, read on these beginner tips and we will teach you how to cut drywall, how to install drywall, how to space your screws and place your drywall to get the ideal drywall joint. Even if you are a beginner, you can totally DIY hang the drywall!
Best Tools For Cutting & Hang Drywall - Best Drywall Cutting Tool
- Measure
- Hand saw
- Drywall screw
- Drywall setter
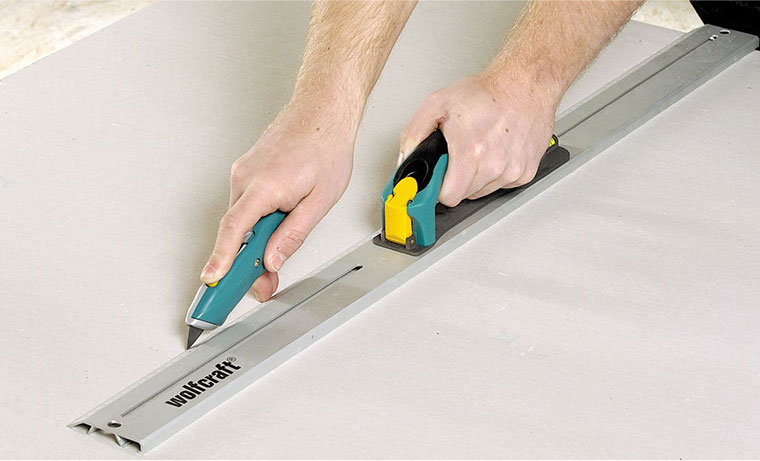
- Sharp utility knife
- Drywall hammer
- Pencil
- T-square knife

Beginner Tips On How To Hang & Install Drywall - Drywall Cutting
1.Planning the job first
The first step to a successful drywall installation is to plan the job on paper. First, measure your wall and ceiling surfaces and mark them down. Then determine whether you're going to install your panels horizontally or vertically. Keep in mind your goal is to have the least number of joints possible usually installing the panels, horizontally is the best way to accomplish this because it will reduce the amount of material that you use and reduce the amount of seams that you have to patch later.
2.Applying the panels
Place the panel with the light colored side up, measure and mark where you need to cut. When cutting drywall you want to make sure you use a t-square and a sharp utility knife to score along the mark just deep enough to cut through the face paper and part of the core to break the core, grasp the panel edges and snap the board with a quick firm movement away from yourself, complete the cutting through the panel by running the utility knife through the back paper.
3.Attaching The Panels
When attaching drywall, whenever possible attach the ceiling panels first fasten the panels to all ceiling joints and perimeter framing. Using drywall screws spacing them every 12 inches. The screw head should be driven slightly below the face of the panel but not deep enough to break the paper. Once the ceiling is completed, apply the walls top panels. First make sure their top edge is up tight against the ceiling panel, set the screws 16 inches apart when installing the top panels avoid having joints above or below the corners of windows, doors or other openings. By doing, so you'll reduce the chance of cracks forming in your finished walls. Once the walls top panels are installed, install the bottom panels. Make sure you cut out the bottom panels accurately to leave a half inch gap between the panel and the floor.
Note: Make sure you use a drywall screw setter and drywall screws when you're hanging your drywall, that screw setter is going to save you so much time. It's going to perfectly sync each screw for you. The perfect depth into the drywall to make it easy to patch later. You also want to make sure that you are hanging your drywall from the ceiling down that will keep the patch the seams at eye level or within easy reach and make patching that drywall easier. Later, you can mark your studs with a pencil to make it really easy and clear where your screws need to go before you start screwing in.

4.Creating Cut Outs
To create a cutout for things like an electrical outlet, measure across from the point where the edge of the panel will rest to the near and far sides of the electrical box. Then measure from the point where the top or the bottom edge of the panel will fall to the top and bottom of the box. Now trace an outline of the electrical box at the appropriate position on the panel then cut with a keyhole saw.
That’s all about how to install drywall the right way! Now, you can easily install the plasterboard yourself in a matter of hours, depending on the size of your room!


 16
16