EN
EN FR
FR PT
PT AR
ARLooking for a new way to bring renovation to your garage? Hanse ceramic & porcelain tile is any easy way to cover your garage floor. It's long lasting and easy to install. We're going to take you through installing Hanse floor tile in a garage. Which can be ordered directly from our website. Here is a step-by-step guide for installing tile flooring in garage.
The Tools You Will Need For Installing Floor Tiles In Garage
- A measuring tape
- A metal ruler
- A rubber mallet
- A chalk line reel.
- A knife or a guillotine
- Adhesive and double-sided tape

6 Steps On How To Install Floor Tiles In Garage
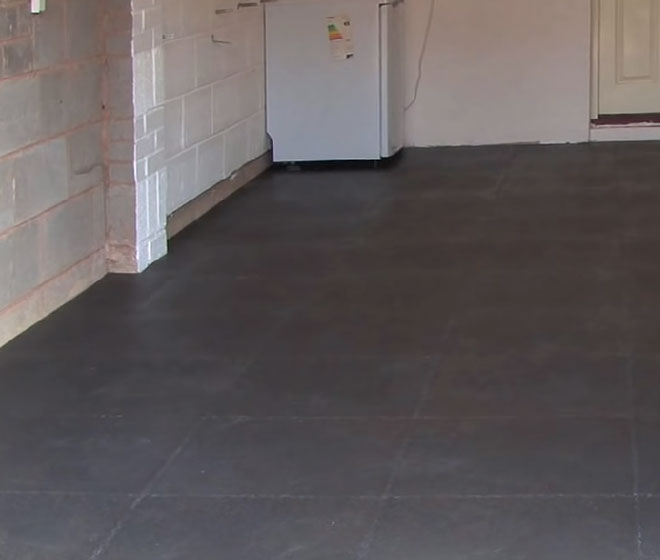
Before ordering, measure the area and work out how many ceramic floor tiles or porcelain floor tiles you need. Before the garage tile installation, the floor needs any gaps or holes filled in and then the whole area swept to ensure there is no loose debris. If the area is cold, that's under 15 degrees centigrade, then warm the area up with the tiles inside. This will allow the tiles to acclimatize. Here are the garage floor tile installation steps.
1. Considering the garage floor tile layout
Use your measuring tape to work out the best layout for your garage floor tiles. You want to avoid leaving yourself with small fiddly cuts around walls and posts. Having worked this out, make a mark near the middle of the floor where the edge of one of your tiles will be. Now, measure from this mark to one of the walls. Make a couple of further marks top and bottom of the area using this same measurement. You'll end up with a number of marks that are at an equal distance from the wall
2. Making a straight line
To get an accurate straight line, screw down the chalk line reel so that it covers over the top mark. Take the reel and use the string to line up all the marks. When you're happy that everything lines up, ping the string to make the chalk line. You now have an accurate straight line to work from. If you don't start with a straight line, everything else can quickly become very difficult!


3. Putting down the first tiles
Start hammering together your first line of tiles. Add tiles either side of this line to anchor this initial line down. Then, move the tiles and line them up accurately with the chalk mark. This is now a straight and stable base to add the rest of the tiles. Then continue adding tiles until you are ready to make any necessary cuts.
4. Cutting the tiles
Between the tiles and any wall, there needs to be a 5 millimeter expansion gap. To help you accurately measure this, the corner of every tile has a marker set back 5 millimetres from the main lug of the tile. To make a cut, turn the tile upside down. Push it so that the lugs are against the wall. Then mark the tile using the edge of this marker. And do the same the other side. You can mark up a whole row of tiles before you start cutting. To cut the tile with a knife, use one of your tiles upside down to guard your floor. Put the garage floor tile to be cut on top.
Next, use the metal ruler to line up the marks you've made on the tile and make the cut. You may need to go over the cut a few times. The tile now fits leaving the 5 millimetre expansion gap. To speed up the process of cutting the tiles, you can hire out a guillotine. The marks on the tile are lined up as before and the cut is made. If you are attempting to cover a large area with tiles, using the guillotine is certainly worth considering. Then continue making cuts and work your way around the wall.
5. Working around awkward areas
There are always going to be tricky areas in any installation. This section here has two walls at different depths with a pillar between them. To make the middle tile fit, you will need to make a number of measurements, marks and cuts. The middle tile is currently cut roughly to size. Lift up the left hand tile and attach it to the middle tile. Use your ruler and pen to mark the top of the left hand tile on the middle one. Do the same using the tile on the right hand side.
You now have the depth the tile needs to be on either side. Next, you need to take a couple of measurements at each side of the pillar. Measure from the left hand side of the pillar to the inside of the lug. This again is done in order to leave a 5-millimeter expansion gap around the garage floor tile. Now use that measurement to mark up the left hand side of the middle tile. Take a measurement at the front of the pillar to the inside of the lug and mark that up. Then take the final measurement from the right hand side of the pillar and transfer that to the middle tile. You can now use the metal ruler and knife to make the cuts by following the lines you've drawn. Protect your floor by using a spare tile underneath the one you'll be cutting. Finally fit the finished cut tile. You'll notice again that a 5 millimetre expansion gap is left around the floor tile where it meets the wall.
6. Finishing garage floor tiles laying off
To finish the job off, the tiles are cut flush with the edge of the concrete at the front of the garage. We complete the job by securing double-sided tape under the front of the floor tiles.


 16
16