EN
EN FR
FR PT
PT AR
ARIn this article, we’ll cover everything you need to know about how to mix thinset for laying tile, from how to mix a small batches to how to mix thinset for wall tile. I’ll also mention how much to mix on your first batch. So you can get to work on your next tile project with confidence.
Step By Step Guide On How To Mix Thinset For Laying Tile
1. Choose the right tools
The first step to mix thinset for laying tile in bathroom, shower or kitchen is to gather your tools and supplies in one area so they're all ready to go I've listed all the recommended tools and supplies below:
- Five gallon buckets
- 1-3 quart plastic measuring containers
- Mixing Paddle
- Power Drill or Mixer
- Gloves
- Safety Glasses
- Dust Respirator
- Digital Scale (optional)

2. Always add the water before the thinset
Add the water to the bucket first, you’ll want to use about a quart of water to start with for your mixing thinset. Next it's time to decide how much thinset you're actually going to mix. If you have very little or no experience working with inset, then you should never mix an entire bag at once because you won't be able to use it all. The thinset will likely harden before you have time to put it all on. So, start with enough thinset to cover about 20 sq. feet, then adjust from there on your next batch. Usually, it will say on the back of the thinset bag how much sq. footage it will cover given different trowel sizes, so you can calculate how much based on that.
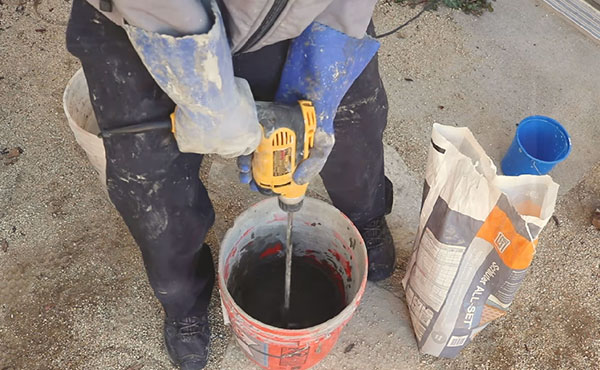
3. Add thinset and mix to desired consistency
Once you've added the water, it's time to add the thin-set and mix with a power drill until you get the desired consistency. There are two ways you can get the right consistency. The first method is to slowly add thinset until you get the desired consistency which is like peanut butter basically it needs to be wet enough, so that it's workable and will actually stick to the surface you're applying it to, but not so wet that it's dripping off the wall and it can't hold a notch from the trowel, you'll know it's too dry if it won't stick to the wall and it's too wet if it won't stay in place or hold a notch.
This method requires less measuring but the problem is that it takes a bit of experience to get it. So the second method is to carefully measure it out some bags of thin-set are gonna tell you the exact ratio of thin-set to water, you may need to figure out how many pounds of thin-set to add per quart of water, so this method is great because it requires less experience to perfect but it does require a scale to measure the thinset which not everybody has a scale laying around, so you can mix it using your best judgment or measure it out carefully with a scale.

4. Keep mixing for time specified on the bag
Once you've got the consistency dialed in, just keep mixing for the amount of time that says on the back of the bag and you're going to want to follow the directions on the back of your thinset bag exactly, because they're not all the same and it's very important that you mix it for the time specified on the back of the bag.
You'll want to use a drill and a paddle mixer with a slow setting. If you don’t have a mixer you can also use a power drill, but you will not want to do this by hand. Halfway to keep it from spinning too fast but sometimes you just need to use what you have.
5. Let it slake
Next, let it slake which means just let it sit for a while usually about ten minutes, but you're going to want to follow the directions that are on the back of the bag, this allows the chemical reaction to start taking place and it gives the thinset time to start absorbing the water.
6.Mix again for 2-5 minutes
Once your timer goes off, mix again for a few minutes. However long it says on the back of the bag and then it's ready to use. You may notice that the thinset gets thicker after liking, but it will thin back up to a workable consistency as you remix it. So you need to first add the water then add the thinset and mix for about 2 to 5 minutes depending on what it says on the back of the bag, let it slick for 10 minutes. Mix again for 2 to 5 minutes again depending on what it says on the back of the bag and then it's ready to spread and here are just a few more quick tips.
- Never add water after you've let it slake. If you do, it's gonna weaken the thinset which is not good. You do not want the ceramic tile to fall off the wall two weeks after you install it. Now you can remix that, then set once or twice if it starts to harden on you while you're working with it, but never add more water after the slaking period
- If you're using the Schluter system, then use their thin set mortar, they have a lifetime warranty on their waterproofing system, but only if you install the product correctly which means using their stuff across the board.
- Mix it outside. You'll want to wear a respirator and mix it outside to avoid having you or your family breathe in the dust.


 16
16